
We had been talking about adding an arbor or trellis for our grape vine to climb on as it grows. Originally we planned to make it an archway over the entrance to our garden – however logistics seemed to point me away from that idea. I pictured all these grape vines (you know how they get) and all these spiders,wasps and bees swarming around your head as you entered into the garden… no thank you. I will save the screaming like a girl for more memorable occasions in which I have to run into spiders – not on every single trip to the garden.
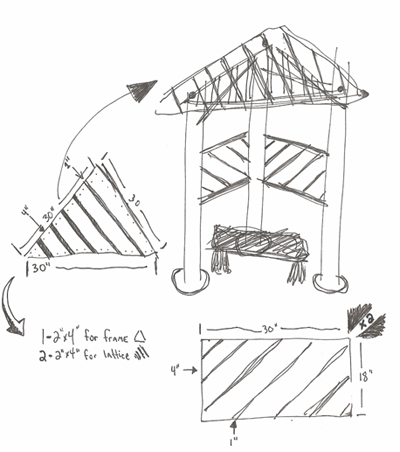
Anyhow, Saturday morning I was up a the butt-crack of dawn… actually about 5:30 so it was prior to dawn, it was dark. I had about 10 cups of coffee and was feeling them and started to design the arbor for the grape vine on a piece of paper. My Grandpa always uses napkins on his table to plan his work (he would rebuild houses and things of that nature) and I guess this was the “Grandpa” coming out in me. Anyhow, before I knew it I had a pretty good schematic of what to do and had gauged my lumber, materials and all that.
By the time Shala woke up, I had it all finalized and she caught a glance of it while I was grabbing breakfast and when I got home she said…
“Damn son, you’ve been doing work.”
I laughed, knowing what she was talking about by the sound of her voice. Here is the “blueprint” of the grape vine arbor so you can see what it was supposed to look like.
This wasn’t the only thing we had planned for today. We had a busy morning running to various garage sales and a couple estate sales were on the menu too. I know, we are so classy eh? We like rummaging through other people’s shit ok!?!
After hitting up those, I will let Shala fill you in on what we got and how much we spent, we went by Lowe’s to grab the supplies needed to build the grape vine arbor. All in all we picked up about 90$ worth of supplies, however I bought more than needed, since I wanted to do a few other things as well while we were in the mood. I went ahead and picked up treated lumber so it wouldn’t warp and retard itself into some foreign object in a year.
Started working on it about 12:30 on Saturday, had to pick up some post hole diggers, since we didn’t have any in our set of yard tools just yet. Dug the hole for the 3 posts, and got them staked down so they were level and wouldn’t move – then poured the concrete to hold them in place. All of that took about an hour tops – multi-tasking as always we had started watering the front & back yards and had a million other things going at the same time. Thats how we like it.
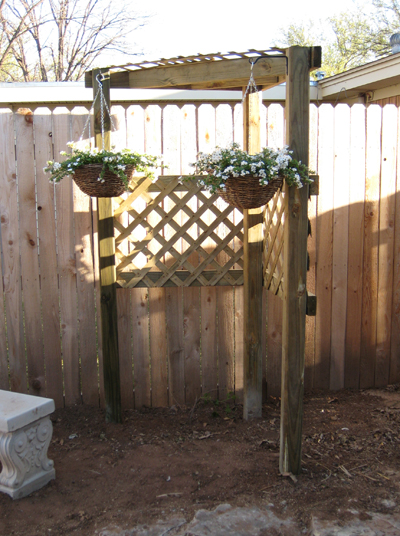
After pouring the concrete, I decided to build the top and side pieces seperate and then attach them to the posts afterwards. I felt this would be easiest, since the posts hadn’t set just yet and I didn’t want to wait all that time to start. So that is what I did, built the top first part, and then the two sides. My Mom & Stepdad came by at about that time and we visited with them and I had him help me put it atop the posts and screw it in. It all was up in about 3-3.5 hours. Which to me isn’t bad at all.
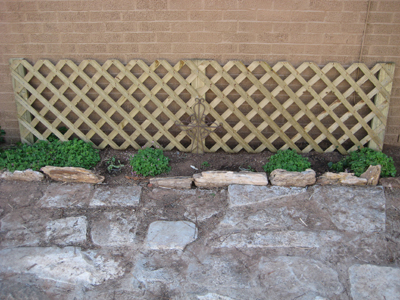
I had some extra supplies left, some 2×4’s and lattice – so we threw together a few pieces for the flowerbeds that hug the garden itself just to tie it all together. They were simple and quick to make and really they turned out pretty cool. We have some climbing flowering plants in those flowerbeds, so they will enjoy climbing all over that stuff this summer.
You will notice a few hanging baskets in the picture below that my wonderful wife did all by herself. I was so proud that she was able to run that electric screwdriver that I am dreaming up other things she could put together next weekend. I am not sure the flowers in those, we will update this post with that information later. We planted the two vines one on each side and will string some wire between eye-hooks (is that the right term?) near the bottom so the vines will have something to climb on early in life. The two vines will take years to be that big, but it is all about building something for the future right? See the picture below for the finished product.
Update: Looks like this article has been pulling in tons of search results. Most people are looking for grape arbors, grape arbor design, grape trellis and grape vine trellis design. Summer is quickly approaching and people are looking for ways to get active in the yard or garden and building a grape vine arbor is a great way to do just that. Welcome Googlers, feel free to ask any questions you might have regarding my design and I will do my best to answer them. Also be sure to sign up for our RSS feed and keep updated on Double Danger.
dam! Yall need to buy a farm or something!
man that is awesome. looks like HGTV was at your home.
Very nice. I found this site while looking for plans to build a grapevine arbor. It looks very good, great idea. Where are the grapes? Have you planted any yet? If so, do you have photos?
Thanks,
Great idea, i am going to have to borrow it, i will give you the intelectual credit you deserve. Thanks
Nice. .
This gave me some of my own ideas. I will start my project tomorrow after my husband goes to work.
LOL I am not looking to ask him for permission to do what I want. I’ll just do it and deal with it later.
Thanks.
I’m passing this idea on to a friend…looks great!
I hate to burst your bubble but thats not that clever, good effort and all but we don’t hand out 9th place trophys in the real world
Wow, “Bob”; you’re a freaking tool. Good luck with that.
Like many of us, the OP just needed a place for his damn grapes to climb. Like many of us, he improvised.
I didn’t see any boasts that he wanted a ~*pony*~ for his efforts, or anything.
Thanks for outing yourself as a troll, tho.
Just bough a Southern Home muscadine grape and was looking for a trellis design ideas..and end up here.
Great idea .!
Great story.!
And by the way ” We like rummaging through other people’s shit ! Too..LOL
What did y’all find at the estate sale and garage sales?
I enjoyed the article, and the design. I’ll probably use it when building mine because after looking at the final pics it looks like the arbor can be added on to in the future.