
 All BBQ starts with a great fire… a perfect fire if you will. Mastering that fire will create a consistent cooking time, flavor and overall barbeque experience. I will do my best to outline the methods I use to create the “perfect” barbeque fire, which will in turn point you in the right direction towards creating the “perfect” BBQ. In this article, you will learn cooking temperatures, fire building techniques and wood selection (for flavor).
Please do not feel hurt or argumentative in the fact that I will not speak of the gas or heating element alternatives to grilling, smoking and cooking. I am not knocking the George Foreman Grill you got for Christmas last year… nor am I ignoring the fact that steaks, burgers and tons of other meats taste awesome coming from a gas grill. Knocking anything is not my intention – at all. I simply do not know those elements like I do BBQ & grilling with wood or charcoal products. Accept my apologies for not explaining it… if you write it and it is well written and comprehensive, I will post that along side mine. I am a lover of all things BBQ – please believe it.
Obviously – to start a fire… you must first have a BBQ pit. Well – I guess one wouldn’t have to if one wanted to grill, rather than BBQ. What?! Aren’t they the same? No way. Are you crazy? No – just uneducated in the culinary arts. Nothing wrong with that, that’s why I am here. Let us first go over the difference in BBQ & grilling.
1. Barbeque (BBQ) – (abbreviated BBQ, Bar-B-Q or Bar-B-Que or diminuted, chiefly in Australia, New Zealand and the United Kingdom to barbie, and braai in South Africa) is a method and apparatus for cooking food, often meat, with the heat and hot gases of a fire, smoking wood, or hot coals of charcoal and may include application of a marinade, spice rub, or basting sauce to the meat. The term as a noun can refer to foods cooked by this method, to the cooker itself, or to a party that includes such food. The term is also used as a verb for the act of cooking food in this manner. Barbecue is usually cooked in an outdoor environment heated by the smoke of wood or charcoal, or with propane and similar gases. Involves indirect heat. – wiki
Damn homie… dat derrr is some down azz BBQ son.
2. Grilling – a form of cooking that involves direct heat. Devices that grill are called grills. The definition varies widely by region and culture. – wiki
I am thinkin’ bout grilling some steaks Sunday for the super bowl.
All that to basically say… direct or indirect… that’s the question. Do you want a flame kissed medium steak with grill marks, some kabobs or shrimp? You should be grilling. If you want some pull pork sandwiches, maybe a rack of ribs and a beer can chicken… you are BBQ’n. Slow cooked, flavorful meats are going to be BBQ’d… charred undercooked (not chicken or raw stuff… come on) meats – hello grill.
Movin’ on.
Your fire has to dictate the heat & type of cooking you are doing. Grilling is done over a high heat & sometimes flaming fires. BBQ is a smoldering smoke-laden fire.
So for a Grilling fire – you want to build a nice pyramid of charcoal (unless you have a chimney starter) – read the bag for now many you should use depending on the size of your pit/grill. You can use a presoaked easy-light charcoal if you are able, if not, grab the normal charcoal and make the same pyramid and apply lighter fluid. Be sure you do not put too much, as you do not want to burn your backyard or neighborhood up. That would not be cool. A few squirts and your good – the more you put on, the more you will have to wait for to burn off.
When it comes to BBQing (low & slow) you want to build the same pyramid, however position it on one side of the pit, so that you can isolate the fire – allowing indirect heat & smoke to cook the meat. On the side opposite of the fire, you will want to place a pan with water. You can use the foil-throw-away kind that you can buy in the store for 1-2 bucks. Fill it up with about 2 inches of water. This will create moist heat/smoke inside your pit and make your meats more moist & flavorful. Also – it will catch any drippings, if you do not have a grease can.
After building your pyramid & setting your pan if you are BBQing, you need to get your favorite lighting utensil (long matches, long lighter) and get to lighting. If you have opted for the user-friendly version of charcoal, you can simply start at the top at the side that is farthest away from your body with the pit open. Light one corner and then follow the back edge until all of the back is totally lit. After that, light the top of the pyramid and down to the side facing you. Really about 5-6 spots can be lit and a fire will begin to rage rather quickly.
If you decided to lather your coals with lighter fluid, you need to be extra careful when dealing with your fire starting. Pre-soaked charcoal was presoaked in a factory forever ago… so it will not BLOW UP in your face when you light it… you can be gentle with it, and it will reciprocate the favor. However, when you soak your coals yourself… you have to really be careful with it. The best method is using long matches when lighting a lighter fluid soaked set of coals. This allows you to get low, drop it in and run for cover – haha… ok maybe it isn’t that dramatic, but still – use caution is the rule of thumb.
Usually with a lighter fluid fire, you don’t have to light anything but one spot and the whole thing engulfs itself quickly. So no need to use the 5-6 spot lighting system discussed above. Just drop the long match in and run your ass. 😉
Another option you can use if your coal isn’t presoaked or you are out of lighter fluid. You have a flamethrower right? haha Only kidding. A simple solution is to grab some paper towels or newspaper and dip it in some cooking oil and center it amongst your coals. Light the paper towel/newspaper oily thing… and run. haha No, really this will keep a constant fire on the coals giving them enough time to catch and give you the desired fire. Cool huh? Not really.
I must say, so that no one sues me… please be safe and have a water hose, fire extinguisher or paramedics on standby if you are not sure about your fire-lighting skills. Better safe than sorry. I am not responsible for idiots and/or folks that do not read thoroughly. Thanks 😉
Now that your fire is started, you must leave your coals alone (BBQ pit lid open) until they have ashed over and have a nice red glow to them near the center of the pyramid. This will likely take about 30 minutes, depending on the size of your pyramid and pit. After that, you can shut your lid and let the pit heat up a bit.
While your pit is coming up to the right temperature, you can now go and grab your favorite wood chunks or presoaked (in water) wood chips (if you are BBQing). What?! You didn’t presoak your wood chips in water for your BBQ? I left that part out didn’t I? Sure did. I doubt you are reading this while you are actually doing this are you? Come on. Let us touch on the types of wood used for burning & chips for smoking.
There are several types of woods that can be used to cook with. Below we can talk about each wood and what it brings to the table pit:
1. Cherry wood is a great wood to use on beef and pork. Cherry wood is usually used in combination with other woods like Hickory, Alder & Oak. Expect a deep rich color from cherry wood.
2. Alder Ash wood has a natural sweet taste and compliments fish & poultry very well. Smoking Salmon? This is your wood here.
3. Red Oak is the top of the line, easy to use and overall top selection for smoking. Of course everyone has their own favorite.
4. Hickory is the cream of the crop in the Midwest & South – however some bark of its strong flavor & if not used right, it can turn meats bitter. A great wood, but be careful not to over-smoke with it.
5. Maple is close to Alder Ash – having sweet flavor & dark characteristics. Sugar Maple is the sweetest of all woods and should be teamed up with Apple or Oak.
6. Apple is another great poultry wood, providing medium flavor and natural sweetness. Ham & Pork is a good match for this one. Ham being the perfect match.
7. Mesquite is a griller’s wet dream. Honey Mesquite even more so. A naturally oily wood, Mesquite pops and hisses with the best of them and burns HOT HOT HOT and fast too. Not recommended for long drawn out BBQing.
8. Be weary of Pear, Peach and Plum. All require an expert’s touch – and if you are reading this… you are probably not blessed with that just yet. Peach and Plum woods lose their flavor shortly after being cut and for the best results, make sure you use the fruit bearing kind of Plum wood.
9. Pecan, sister to Hickory is known for burning cool and providing delicate flavor. This wood is becoming more and more popular, but be easy with it – another sharp tasting wood if over used.
10. Other options include Grapevine cuttings, Herb woods (Basil, Rosemary & Thyme) add a nice flavors to fish, poultry and beef but produce a lot of tart smoke. With Grapevine cuttings you could achieve the same affect by soaking chips in an wine before placing the wood on the coals or in a smoker’s box.
Now you know everything about wood that you ever wanted to know and then some. What is my favorite? I would have to lean towards Hickory, with Pecan & Oak being close behind when BBQing. Mesquite is my least favorite in regards to slow smoking – it is hard to manage and produces such a sharp dry taste that unless your grilling (which I like it for), leave it for the fireplace. I know my fellow Texans are livid at my last sentence, but its the truth – each their own. Don’t hate.
So my favorite wood techniques when BBQing is buying wood chips (or making them if you are able) & wood chunks. With a medium/large sized pit, you will have better luck controlling your fire with these. Adding logs to a (anything but large) pit will send your temperature blazing – and your BBQ sizzling to a crisp. Chunks allow you to add and shuffle at your on pace, keeping heat down and smoke constantly being produced. I use chips for my smoke, which means I pick my favorite flavor based on the meat I’m cooking and presoak my chips in water – then remove them from water as needed to throw on the coals. This produces smoke for longer periods of time, while not increasing the overall temperature too much.
Now of course if you have a larger pit and want to use logs, they are definitely an option – however, I figure someone that is reading this right now probably does not have a 15 ft trailer with BBQ pits off both sides and so I will leave it at that.If you are grilling, you can chunk on a few wood chunks of your choice – and disregard the whole wood chips & soaking portion. What you want to be sure to do though is keep your chunks of wood on one side of the coals and leave the other side as more of a heat only side (no flames). This will allow you to shuffle your meat of choice around, flame-kissing at times and straight heating at others. It’s a constant battle – but a quick one.
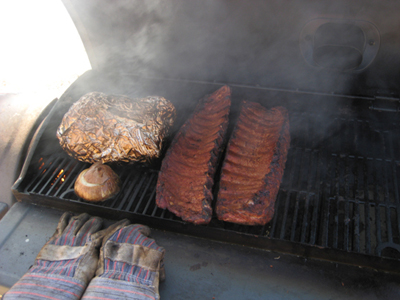
Back to BBQ. After choosing your wood, presoaking and starting your fire – you are ready to start adding your chips & chunks to slowly get your temperature to the right level (between 200-300 degrees) and begin to create smoke. I suggest getting a pair of BBQ gloves, or fire retardant gloves that you can use while placing chips & chunks of wood on the fire. You might also get a industrial set of tongs to place them in places you cannot reach. A consistent fire is key to great BBQ and having the tools to make it happen is vital. The BBQ gloves will be the only way you turn, flip and deal with your meat while it is on the grill. No poking, prodding or anything else of that nature – you want to grab and turn and flip with ease… your hands are the best tools for this. Just be sure to wear gloves to do so. What good are all these tips if you have no fingers… keep your digits!
If you are grilling – expect to have your entire cooking spell over in an hour tops. If you are BBQing… you are in for a long ride. A good BBQ could last 6-8 hours (12 if you are a champ), so expect to be tending that fire the whole time. Lots of beer, friends and time… get comfortable – relax. You want to be sure you do not let your fire go out, or get to hot. This is a touchy situation, but with a bit of practice – it will be second nature. Make sure to apply moistened wood chips as needed (if you see the smoking stop, time to put some more on) and keep the wood chunks on there anytime your heat starts to drop. Your temperature will flare, and then settle, then drop… that is life – keep the varying to a minimal and you will be in good shape.
Just think… after all this hard work – the payoff will be soooooo worth it. I hope this how-to on how to build the PERFECT BBQ (or grilling) fire has helped you in your quest to be a BBQ/Grilling Master. Invite some friends over, be sure to keep an ice-chest close by and have a blast.
damn.. wish i could make it to your superbowl bbq session.
and agread that Mesquite is a bbq’ers wet dream!
Same here…
Looking at the pic just made me hungry, lol.
Nah… Mesquite is a “griller’s” wet dream… don’t get it twisted. BBQ – need to stick to hickory or oak.
Pingback: How To Smoke Pork Ribs - Walk Through, BBQ Tips, Perfect Pork Ribs | Double Danger
Pingback: How To Make Armadillo Eggs For Your Next Barbeque (BBQ Recipe) | Double Danger
I’m a big fan of the chimney starters. I got one a couple of years ago and haven’t looked back. Oh, and lump charcoal instead of briquettes. Much less ash and burns longer if you have a pit with good air control. I can get it pretty cheap up here, and it works for grilling or bbq, although it burns a bit hotter than briquettes, and burns faster when given alot of air.
I agree about the mesquite, good for grilling, but overkill for long smokes. Lately I’ve been using mainly pecan. It’s got a nice sweetness to it, but otherwise is similar to hickory.
For a light, sweet smoke flavor, try pecan shells. They burn fast, but the taste is incredible!
Pingback: Double Danger BBQ Tips: The Super Bowl BBQ Guide | Double Danger
how do you keep a consistent fire for so long? Do you keep adding coals?
det… I have a smoker and have not played around with it on a grill, but what I do to keep a consistent fire and temperature going is to layer LUMP charcoal, (you can buy this at Wal-Mart for around $6 a bag Royal Oak brand) and chunks or chips depending on your heating area, If you put a layer of lump charcoal then add in your wood, then another layer, so on and so forth, it allows the fire to burn slowly down. I also use a chimney starter since I began this method. Light a small amount of coals in the chimney starter and when they are glowing red, dump them ontop of your coals in your heating area. Always remember the MOST important thing to keeping a consistent temperature, is to leave your lid closed over your heat source as much as possible. Every time you open the lid it lets more uncontrolled air in, and lets heat out! My fire box on my smoker is large enough that I can fit, roughly 1/3-1/2 bag of the lump charcoal in my firebox, and it will burn like this for 8 hours without me having to mess around with it, Also give your fire enough time to heat up your cooking area BEFORE you put the meat on, that way you can play with your air vents to get the proper temperatures first and don’t have to worry about ruining what you are cooking because you can’t get your cooking temp right.